
Every year I try to be creative and make most of my gifts. Not just for friends but for my kids aged 2-8, my parents, my sister and even my husband! I try to start in Nov. If I don't get started getting them done I try to at least be compiling ideas.
Here are my current favorites and most of these I am currently working on for my 8 yr old or my 2yr old.
BEST DIY GIFTS FOR BOYS..
Fort Kit

LOVE this idea and already made my son one this year for Christmas complete with cool bag and with the downloaded tag from above. Complete directions found HERE from Saltwater-kids. You can also download the fort tags which in my opinion really add the final touch! PS you can make a cool girly version as well!
Cutest Sock Monkeys EVER

Full directions and pattern found HERE at craft passion. I am trying to make two of these for Christmas for my 2 year old son and my coming new born. The eyes and ears make them SO cute!
Guys leather cuff bracelet

What a great simple idea! I am making one for my sons, myself and sister! Find a clear easy tutorial HERE at The Red Kitchen My girls shouldn't get to have all the fun dressing up! My two year old is always wearing their necklaces and crowns, so I think it is time for him to get his own guy jewelery.
Guys nail cross necklace
 I saw this at Molly Dodd listed as a summer camp craft. There are no directions but it looks straight forward enough. I love it because it is a visual reminder of what Christ did for us as well as being pretty awesome.
Lego Tray

This clever idea from Some What Simple is perfect for my oldest son and my oldest daughter! We are making them each one. This enables them to keep a project they are working on and transport it out of a bedroom when a sibling needs to nap, or keep it out of reach of curious hands. My daughter has recently gotten into the "Friends" girly lego kits and can play for hours! When she is done though she doesn't want to put it all up as she is playing with it still so this is perfect! I just bought the lego flats at amazon pretty cheap.
DS travel pouch
 I really like this DS travel pouch with spaces for games. Keeps it all organized and together. There is a full tutorial to print off but I hope you speak French as it is not in English. I am still debating if I will be able to get to this one, but hope to! I would make one for my daughter and son! Check out the tutorial HERE at By Gabs.
Super Hero Costume


Find the mask tutorial HERE at Swanky Press I used it as a guide and added thunder bolts to the sides. Check the eye holes to make sure the little one who will wear then will be able to see.

I used this tutorial from The Train to Crazy to make the cuffs, because how cute are they! I just made mine with thunderbolts to match the mask and made everything out of blue and red felt. Really easy project that really adds to the costume! My girls always dress up so I wanted my son to be able to join the fun!
Hobby Horse or Stick Horse
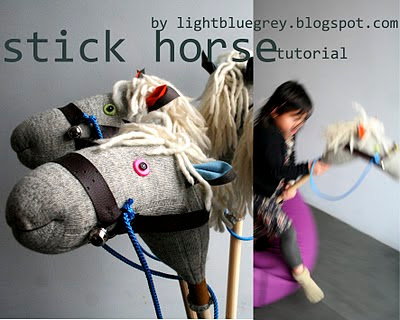
My little cowboy would love this! In fact I have one in the works right now. I know there is only 6 days or so till Christmas so I better get on it!! This one has a great tutorial at Light Blue Grey. I love all the details she uses!

This one by Dandee-Designs is really cute too! She has a great mane tutorial and her horse doesn't take many supplies. I think it turned out so cute! I need to finish mine!!
DIY Dinosaur Fossil Kit

My son LOVES the fossil kits you buy that you chip away to find the dinosaur bones and then put it all together. This is a similar idea, from Paper Vine NZ and it looks so simple! I would like to find a dinosaur 3 d puzzle to use on the inside and probably won't bother with the mold. A loaf pan would work great. You can just hide the dinosaurs or dinosaur pieces all over. As he gently chips away at the block he is rewarded with discoveries and you are rewarded with hours of silence! A rare joy for mothers of boys!
DIY Art Station

Last but not least a fun was a bit hit with our son a few years ago.I made a space for both my son and daughter and filled it with fun glitter, pipe cleaners, glue, crayons, markers, etc.. Check out my post for more details HERE.
Need more ideas? Check this older post "Need to save some cash? Homemade gifts and online secrets for savings!"
Hope you enjoyed these ideas! What are you making the boys in your life? Love to hear more ideas!

Here are my current favorites and most of these I am currently working on for my 8 yr old or my 2yr old.
BEST DIY GIFTS FOR BOYS..
Fort Kit
LOVE this idea and already made my son one this year for Christmas complete with cool bag and with the downloaded tag from above. Complete directions found HERE from Saltwater-kids. You can also download the fort tags which in my opinion really add the final touch! PS you can make a cool girly version as well!
Cutest Sock Monkeys EVER
Full directions and pattern found HERE at craft passion. I am trying to make two of these for Christmas for my 2 year old son and my coming new born. The eyes and ears make them SO cute!
Guys leather cuff bracelet
What a great simple idea! I am making one for my sons, myself and sister! Find a clear easy tutorial HERE at The Red Kitchen My girls shouldn't get to have all the fun dressing up! My two year old is always wearing their necklaces and crowns, so I think it is time for him to get his own guy jewelery.
Guys nail cross necklace
 I saw this at Molly Dodd listed as a summer camp craft. There are no directions but it looks straight forward enough. I love it because it is a visual reminder of what Christ did for us as well as being pretty awesome.
Lego Tray
This clever idea from Some What Simple is perfect for my oldest son and my oldest daughter! We are making them each one. This enables them to keep a project they are working on and transport it out of a bedroom when a sibling needs to nap, or keep it out of reach of curious hands. My daughter has recently gotten into the "Friends" girly lego kits and can play for hours! When she is done though she doesn't want to put it all up as she is playing with it still so this is perfect! I just bought the lego flats at amazon pretty cheap.
DS travel pouch

Super Hero Costume

This is the set I made for my Cruz (hence the C super cape)! I know he will love it!
Find the mask tutorial HERE at Swanky Press I used it as a guide and added thunder bolts to the sides. Check the eye holes to make sure the little one who will wear then will be able to see.
I used this tutorial from The Train to Crazy to make the cuffs, because how cute are they! I just made mine with thunderbolts to match the mask and made everything out of blue and red felt. Really easy project that really adds to the costume! My girls always dress up so I wanted my son to be able to join the fun!
Hobby Horse or Stick Horse
My little cowboy would love this! In fact I have one in the works right now. I know there is only 6 days or so till Christmas so I better get on it!! This one has a great tutorial at Light Blue Grey. I love all the details she uses!
This one by Dandee-Designs is really cute too! She has a great mane tutorial and her horse doesn't take many supplies. I think it turned out so cute! I need to finish mine!!
DIY Dinosaur Fossil Kit
My son LOVES the fossil kits you buy that you chip away to find the dinosaur bones and then put it all together. This is a similar idea, from Paper Vine NZ and it looks so simple! I would like to find a dinosaur 3 d puzzle to use on the inside and probably won't bother with the mold. A loaf pan would work great. You can just hide the dinosaurs or dinosaur pieces all over. As he gently chips away at the block he is rewarded with discoveries and you are rewarded with hours of silence! A rare joy for mothers of boys!
DIY Art Station
Last but not least a fun was a bit hit with our son a few years ago.I made a space for both my son and daughter and filled it with fun glitter, pipe cleaners, glue, crayons, markers, etc.. Check out my post for more details HERE.
Need more ideas? Check this older post "Need to save some cash? Homemade gifts and online secrets for savings!"
Hope you enjoyed these ideas! What are you making the boys in your life? Love to hear more ideas!


