Showing posts with label gift ideas. Show all posts

Tuesday, April 9, 2013

DIY lux face, hand, and diaper cream homemade from whipped coconut & shea butter!

I love, love love this stuff!  I cannot get enough of it.  You know it has to be good if I am bothering to make it with 5 kids and homeschooling! Ok it doesn't hurt that it is really fast and easy and works for a plethora of uses.  Yes I did say plethora! Pretty sure I learned that word from the movie "The Three Amigos" in the early 90's.   Anyway...this all natural moisturizer is not only highly effective, free of unwanted chemicals and additives, but it is made from 2 of natures most amazing products coconut oil and shea butter.  
Coconut oil and shea butter are some of the best possible ingredients when it comes to skin care!  If you aren't familiar with coconut oils miraculous healing powers be sure to read my earlier post  "One of nature's best healers! 20 NEW reasons to love coconut oil!". I can't go on with this recipe without letting you first know why it is so fabulous for your skin.  This combo is unlike most commercial moisturizers in that most commercial moisturizers are filled with water so the lotion becomes ineffective as soon as the water dries on your skin.  They are also often filled with additives, and petroleum byproducts that are carcinogenic and can suffocate skin causing breakouts.  Coconut oil and shea butter on the other hand are rich and truly moisturize your skin down at the deepest levels where they are even responsible for strengthening the underlying tissue .  They are both excellent at treating acne as they kill off bacteria and acne is a bacterial infection   Coconut oil also helps remove the dead, dry, flaky layers that causes rough and dull skin.  Convinced? Not yet?  Well African Shea (pronounced shay) butter has been proven to reduce the appearance of lines, scars and stretch marks as well as ease a host of skin irritations such as psoriasis, eczema, and sunburn.  WHAT IS NOT TO LOVE!

So here it is... your super simple 2 ingredient beauty wonder,,,

Combine 1 cup African shea butter and 1/2 cup coconut oil. 
Mix on medium high with an electric mixer for about 5 minutes till you get a nice whip cream texture.  I make  big batches to jar in several containers so I have diaper cream, body butter, and portable hand cream.
That is it!  Now you have an AMAZING face, body, hand and diaper cream that moisturizes at the deepest level, clarifys skin, strengthens the underlying tissue, reduces the signs of aging, scars, lines and stretch marks while treating eczema, psoriasis, and other irritations!  I buy my coconut oil at Costco for a very inexpensive $22 for 78 ozs and the African shea butter I got from amazon for around $18 for 32 oz. with shipping.  I will never go back to a commercial face or diaper cream again!  My face feels amazing after using this.  I use it every morning and night.  I used it on my baby when he was a newborn with a terrible rash that nothing would touch!  The secret was this cream plus a few shakes of corn starch each diaper change.  It is all we ever use now.  You can use it as chap stick, hand cream, body butter, for stretch marks, for acne, sun burn cream etc....  Let me know how it works for you!
Photobucket

Wednesday, December 19, 2012

Top 10 DIY homemade gifts for every boy on your list!

Every year I try to be creative and make most of my gifts.  Not just for friends but for my kids aged 2-8, my parents, my sister and even my husband!  I try to start in Nov.  If I don't get started getting them done I try to at least be compiling ideas.
Here are my current favorites and most of these I am currently working on for my 8 yr old or my 2yr old.

BEST DIY GIFTS FOR BOYS..

Fort Kit
fort kits | diy hang tags | saltwater-kids
LOVE this idea and already made my son one this year for Christmas complete with cool bag and with the downloaded tag from above.  Complete directions found HERE from Saltwater-kids.  You can also download the fort tags which in my opinion really add the final touch! PS you can make a cool girly version as well!

Cutest Sock Monkeys EVER
How To Sew Sock Monkey ~ tutorial and pattern
Full directions and pattern found HERE at craft passion.   I am trying to make two of these for Christmas for my 2 year old son and my coming new born. The eyes and ears make them SO cute!

Guys leather cuff bracelet

What a great simple idea!  I am making one for my sons, myself and sister!  Find a clear easy tutorial HERE at The Red Kitchen My girls shouldn't get to have all the fun dressing up!  My two year old is always wearing their necklaces and crowns, so I think it is time for him to get his own guy jewelery.

Guys nail cross necklace

I saw this at Molly Dodd listed as a summer camp craft.  There are no directions but it looks straight forward enough.  I love it because it is a visual reminder of  what Christ did for us as well as being pretty awesome.


Lego Tray
Lego Tray - I think this is the most brilliant gift. Will have to make some of these!
This clever idea from Some What Simple is perfect for my oldest son and my oldest daughter!  We are making them each one.  This enables them to keep a project they are working on and transport it out of a bedroom when a sibling needs to nap, or keep it out of reach of curious hands.  My daughter has recently gotten into the "Friends" girly lego kits and can play for hours!  When she is done though she doesn't want to put it all up as she is playing with it still so this is perfect!  I just bought the lego flats at amazon pretty cheap.

DS travel pouch 

I really like this DS travel pouch with spaces for games.  Keeps it all organized and together.  There is a full tutorial to print off but I hope you speak French as it is not in English.  I am still debating if I will be able to get to this one, but hope to!  I would make one for my daughter and son! Check out the tutorial HERE at By Gabs.

Super Hero Costume

This is the set I made for my Cruz (hence the C super cape)!  I know he will love it!
diy superhero mask
Find the mask tutorial HERE at Swanky Press   I used it as a guide and added thunder bolts to the sides. Check the eye holes to make sure the little one who will wear then will be able to see.
The Train To Crazy: Handmade Dress Up: DIY Superhero Cuffs Tutorial
I used this tutorial from The Train to Crazy to make the cuffs, because how cute are they!  I just made mine with thunderbolts to match the mask and made everything out of blue and red felt.  Really easy project that really adds to the costume!  My girls always dress up so I wanted my son to be able to join the fun!

Hobby Horse or Stick Horse
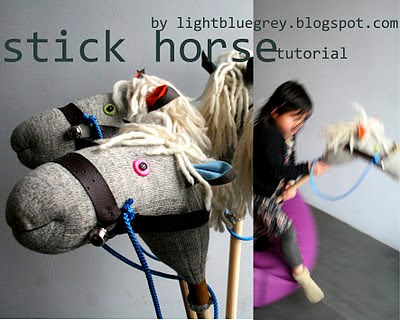
My little cowboy would love this!  In fact I have one in the works right now.  I know there is only 6 days or so till Christmas so I better get on it!! This one has a great tutorial at  Light Blue Grey.  I love all the details she uses!

This one by Dandee-Designs is really cute too!  She has a great mane tutorial and her horse doesn't take many supplies.  I  think it turned out so cute!  I need to finish mine!!

DIY Dinosaur Fossil Kit
 DIY Fossils for Kids
My son LOVES the fossil kits you buy that you chip away to find the dinosaur bones and then put it all together.  This is a similar idea, from Paper Vine NZ and it looks so simple!  I would like to find a dinosaur 3 d puzzle to use on the inside and probably won't bother with the mold.  A loaf pan would work great.  You can just hide the dinosaurs or dinosaur pieces all over.  As he gently chips away at the block he is rewarded with discoveries and you are rewarded with hours of silence!  A rare joy for mothers of boys!

DIY Art Station
kids art station
Last but not least a fun was a bit hit with our son a few years ago.I made a space for both my son and daughter and filled it with fun glitter, pipe cleaners, glue, crayons, markers, etc.. Check out my post for more details HERE. 

Need more ideas?  Check this older post "Need to save some cash? Homemade gifts and online secrets for savings!"
Hope you enjoyed these ideas!  What are you making the boys in your life?  Love to hear more ideas!

Photobucket

Monday, December 10, 2012

DIY Handmade Doctor Play Kit (tutorial). GREAT kids gift!

I love a handmade holiday.  The gifts are so memorable and your kids know you really thought about them while you labored over a great gift.  It sure is cheaper as well!  With 4 kids aged 2-8 girls and boys I have been scouring the internet for ideas and come up with quite a few great ones! This one is great for the boys or girls, and they can all play together.  So here it is... the completed doctor kit.
I think it cost me a total of $4.50!  I found most of the stuff around the house, got the 2 surgical masks from the hospital for free when I was there for an ultrasound, printed stuff off and bought only the bag and stethoscope   Would you believe the stethoscope was only $3 brand new off Amazon!  They had other colors, but some of the other colors cost twice as much (same exact stethoscope), so I thought blue looked fine.  I love that it really works!  The bag was $1.50 at the thrift store and has the great doctor bag shape i was looking for.

Here is a closer look at the contents.  I printed off the labels you see above from the link below and attached to empty containers we had around the house.  I love the vintage uniform look.  The doctor badges I printed off from a great link I posted below that allows you to add your own photo and customize the text.  The silver bottle is a spray bottle filled with water for "wound care" or other imaginative play.  I added some band aid stickers that I printed from the computer onto sticky paper cut them out and put them in a band aid box.  The cotton balls and Q-tips they can use to "clean wounds", and doctor up their siblings or stuffed animals.  The plastic syringes we had as well as the medicine dosser.  You can also get a better look at the monogramed bag tag that I used to girly it up for my Bella.
I added a ear bulb for fun, a water balloon filler as otoscope for inspecting ears, some play money we had to pay the doctor, an ace bandage for wrapping up those sprains and broken bones, surgical masks, and of course the real working brand new stethoscope!  I made both my daughters a badge as I know they will both want to be the doctor at some point in the game.
I put it all together in this really cute doctor shaped bag and added a cute little laminated initial tag to give it a little more feminine appeal since it was for my daughter.  I may add a red felt cross to the front of  the bag on the black.  We will see.
Apothecary Bottles
Vintage medicine labels found free HERE at Eat Drink Chick.
Official Doctor badges created for free HERE at  Big Huge Labs
I am still thinking of adding a small clip board, white shirt for a lab coat (cut of the sleeve's cuff and the tail and hem), and file folder for official doctor papers to include...
Printable x-ray images like those found Here from Net Placesand free printable customizable eye chart from Eye Chart Maker.
I know she will love it!  I expect to get hours of play from all the kids out of this one!
 If you happened across a pair of kids crutches at a thrift store that would be pretty fun for the kids too!   I am sure I will find little things from now till Christmas to be adding in as well.  Hope you found some inspiration for a handmade kit for the kiddo in your life!  Love to hear if you  make one and how it goes! 
Photobucket

Saturday, November 10, 2012

EASY 3 ingredient No Grate, No Cook Homemade DIY Laundry Detergent PLUS Free Printable Labels To Go With It!

I had originally intended to make the laundry soap that requires grating a bar of soap and cooking it all.  I loved the "green" appeal removing all those weird chemicals, and the money saving side of things.  The thing that stopped me (after I bought everything for it of course) was the fact that I did not have a place to store 5 gallons of laundry soap and grating and cooking really didn't sound that fun. I am 7 months pregnant, and have 4 other kids to chase after to occupy my time!  
This recipe is SO fast that I whipped it up at 9pm at night in 4 minutes flat! This recipe is DIRT CHEAP and works well. All you need are a few simple supplies..
Then I saw a simple recipe THANKS to One Good Thing by Jilee!

DIY No Grate, No Cook Concentrated Laundry Detergent 
3 Tablespoons Borax
3 Tablespoons Washing Soda (not the same as baking soda)
2 Tablespoons Dawn or other non bleach effective dish soap

All you do is pour those into a jar or plastic container like your old laundry detergent bottle if you prefer.  Then add 4 cups boiling or really hot tap water to the mix to dissolve it all.  Once it is dissolved simply add enough water to make 1/2 gallon.  Because this is concentrated I only have to use 1/4 cup of the mixture.  You can always see how you like it and adjust how much you need based on your size of load and level of dirtiness.  I used a palmolive dish soap but many swear by blue dawn (specifically the blue one) for it's amazing degreasing abilities.   You can buy all these supplies in the laundry isle at walmart.  I had to ask because they were tricky to find but they had all of them and they were very cheap.

Now if you want to be all practical you can simply make this mixture in an old fabric softer bottle or laundry detergent container, but I wanted mine cute.  I have been slowly redoing the laundry/entry/crafty/office space so I wanted mine to look nice.  Notice the beautiful ironing table /counter surface on the washer and dryer under the laundry detergent?  I just redid that and you can see my ironing table/counter tutorial HERE.  Needless to say I was trying to get rid of the big ugly plastic red jug so here was my solution.
I used an old 1/2 gallon Vlasic pickle jar, some scrap fabric, the free printable labels I provide below and fabric starch to modge podge it all on.  So just to clarify I did not use modge podge, I used fabric starch in it's place.  It's much cheaper and I happened to have some from my DIY Silly Putty Tutorial a while back.

Here is how I did it.

I created the free printable laundry labels for you using Cathe Holden's very cool apothecary labels I blogged about earlier in my post on  Free Printable Labels where I gave you TONS of links to great printable labels.  Those labels are available to download and customize.   For this project I did all that for you already.  You  just need to right click on the image below and open it in another window and print.
I used a rotary cutter and cutting mat with ruler to get a nice straight edge on my fabric (you cold of course use scrap book paper here too) when I cut it to the width I wanted.

Next pour some liquid starch ( a few bucks at walmart in the laundry isle) into a container and lay the fabric down into it so that it is fully coated.  Then use your fingers to strip off the excess as you pull it out.  

Now place it on the jar just the way want it.  It slides around nicely while you adjust it unlike other adhesives like straight up glue.
 
You do the same thing with the label making sure it is coated with the fabric starch and then simply place it over the fabric where you want it.  Be warned if you use really cheap ink like I do in your printer it may fade a little.  Mine didn't really do too bad but it can happen since we are dipping it in so much liquid.
 To cover the lid with fabric trace a round shape the same size as the top of your lid and cut it out.  Then dip it in fabric starch and place on top the lid.
 For the edges you can cut a thin strip again using your rotary cutting tool, cutting mat and ruler.  Dip in fabric starch and place around the lid.  Would it be nicer to paint the lid first?  Probably, but I didn't want to go get the spray paint out.  So I went with what I was already using.  Below is a picture I did with another of the labels I provided above.  That is the nice thing.. You have lots of choices.  You can adhere the label straight to the jar but I just wanted to add the fabric for decor reasons as that is how I roll!
I really love the results.  So just to recap.. the soap takes all of 4 minutes to make and costs pennies.  You don't have to bother with all the jar decorating, but how fun would that be?  What do you think?  You gonna give it a go?  I didn't give a price breakdown earlier but it is CHEAP CHEAP CHEAP to make this soap and it works just as good as other detergent. It is very low suddsing so you can use it in a HE front loader like I do. You can even try scenting it with essential oils, like lavender.  I think when I am done posting this for you I will go grab my lavender essential oil and do just that!
Photobucket

Saturday, September 22, 2012

Tons of Free Printable Labels! Think canning, notebooks, organizing, paper crafting, etc...

I don't know what it is but I LOVE free printables labels.  There are so many uses and whatever you are doing suddenly looks a million times better.  These would be great on cards and as gift tags too with the right wording!  There are blank customizable ones here as well.  ENJOY!!
mason jar labels
I LOVE these printable jar labels!  The possibilities are endless!  Use for canning, gifts, pantry organization, etc... Find them HERE from Limeshot Design


These adorable birdie labels from world label. Come in shipping label, address label, and circle sizes!  They are all a matching sets but slightly different.  Great for gifts, closet organization, pantry and crafty organization, canning, and whereever else your crafty  mind takes you!


These are perfect to print onto cardstock or sticker paper for scrapbooking, cards, or cute homemmade spa gifts!


Whatabout these?  Perfect for a circle punch!  You could print them out as stickers, gift tags, jar labels, etc... Find them HERE at i do it yourself.


Not enough options for you?  Check out my previous post Freebies Gorgeous Printable Labels of All Shapes and Sizes!  Here is a sample of what you will find...


 You can also follow me on Pinterest to see what I have in the printables board, not to mention all the other great crafty projects I have pinned on there!
PhotobucketFollow Me on Pinterest

Monday, August 13, 2012

Making Your Own DIY Day Planner! Tons of Free Tutorials & Printables!

A good planner is one that you enjoy and suits your needs.  Need a section for homeschool?  How about a blog post section to keep track of you ideas for future posts and schedule them out, as well as all the regular weekly and monthly calendar sections.  I am putting my own together and thought you might enjoy making use of all these free printables I am finding to put it together with.  Adding in fun things like smaller tear out shopping lists, pretty scrap book paper, envelope or pocket pages etc.. add in what you can't just go buy at walmart.  Make it yours!


A variety of great homeschool planners can be found at this roundup of free homeschool planners here at re we there yet?


The homeschool one I used is a simplified planner with just the daily schedule, goals, a list for attendance and list for books read, and curriculum.  It doesn't include a daily sheet for planning each day of work.  I am using the regular week planner for that.
creativemamma_2013cal1
I love these free 2012, and 2013 printable calendar fromCreative Mama This would make a really cute monthly calendar planner or scale it down to fit in your smaller day planner between your weekly pages.


For  the weekly pages I like this printable from Sofia's World


I also love the simplicity and size of this simple free printable weekly planner by Anderson Family Crew.


This great year at a glance calendar covering 2012 and 2013 is from a blog planner by Homeschool Creations and it is page 2 if that is all you want to print from it.

plannerpromo1
I love this blog post planner another free printable by Confessions of a Homeschooler!  SO CUTE.
Free Menu Planner Printable$Free printable Menu PlannerFree Printable Menu Planner/Grocery List
I have included a list of links to cute  menu planners if you want to include those as well here at Pinterest.

Once you print out the sheets you want to include you can add random pieces of scrapbook paper for notes and cuteness factor, pocket pages, dividers, and anything else you want.  Then you can take it to your local office supply store to have it bound (only $1 here for comb bound!).  Some people make their own cover from cardboard covered in scrap book paper or use a vinyl cover. You also have the option of just using a 3 ring binder or punching holes and using ring clips.

Here are two blogs who did a great job making their own.  I have included them so you can get any inspired ideas from them.


Here is one from Apple Head Threads. I love this detailed explanation on how she made hers and what she included.

Craftee Finished Dividers with Labels
Here is another crafty planner from Craftee that has great ideas for the dividers!


Check out this cute small planner with tutorial from ahhh-design


She also has a great tutorial for binding it yourself HERE!
Have fun and be sure to let me know how yours turns out or if you found any great free printables to add!

Photobucket